

How To Select All White In Photoshop
Colourise a blackness and white photo in Photoshop
In this tutorial I'll walk through a quick and easy way to colourise a black and white image using the Color Rest tool. For each color that you desire to incorporate, add a Color Rest adjustment layer, shift the color sliders to give you the desired hue, invert the layer mask, and then paint the effect dorsum in just where needed with a white brush.
For slightly more realistic recolouring of skin and hair, bring in the Blending Options console. This way you can fade the colourising effect in the shadows, have full-color in the mid-tones, and fade the colour out again in the brightest highlights.
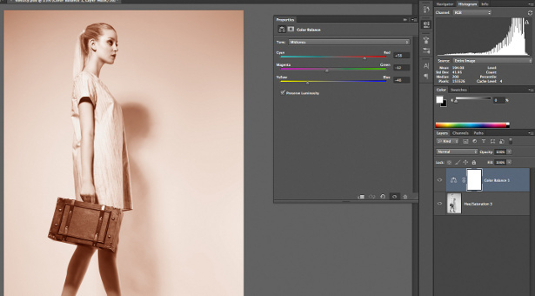
01 Load your black and white paradigm and so add a Color Residual adjustment layer. We desire to create a somewhat natural-looking skin colour here, so hither I'm using the settings: Ruby +55, Green −12 and Blue −48, to give an orange hue. Now, to hide this colouring effect, invert its mask by pressing Cmd/ Ctrl+I with the mask selected in the Layers panel.
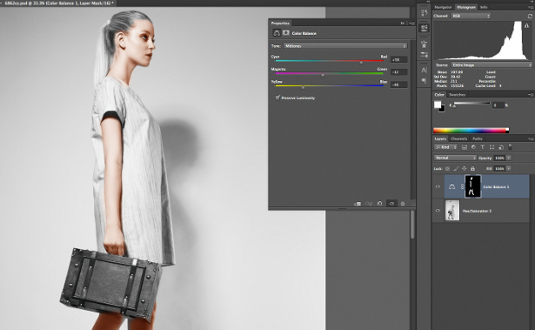
02 Using a medium-soft white paint brush, with full opacity and flow settings, you can crudely pigment the colouring effect in over any skin regions. We've got a rather rough colouring – and you could go out it like this for an unsubtle, retro expect. But we tin create a more complex and realistic skin colour result by tapering our color strength. So Ctrl/right-click the layer in the panel and bring up the Blending Options console.
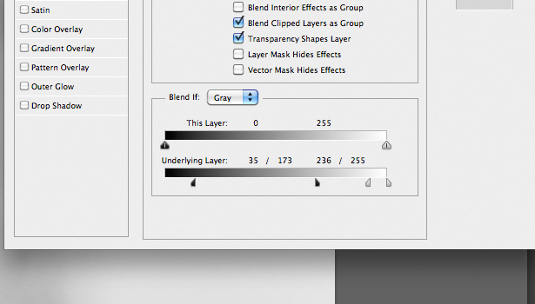
03 Now become to the Blend If options. With the Underlying Layer sliders, you can control where the colouring effect punches in and out based on the luminosity of the underlying image. Opt/Alt-clicking the sliders lets you break them autonomously and fade the effect in, and then out again. I'm using values of 35 and 173 on the black signal, and 236 and 255 on the white point.

04 You lot can add some other Colour Remainder aligning layer to colour in the hair. Here I'm using a blondish yellowish: Red +12, Dark-green −22 and Blueish −62. Mask and reveal as in step 01. I'm using the Alloy If sliders hither to give darker hair roots: I'thousand just breaking apart from the black slider and having that fade in from 0 to 163. I've also selected Highlights, in Color Balance, to decrease a bit more Blue, taking it to -9.
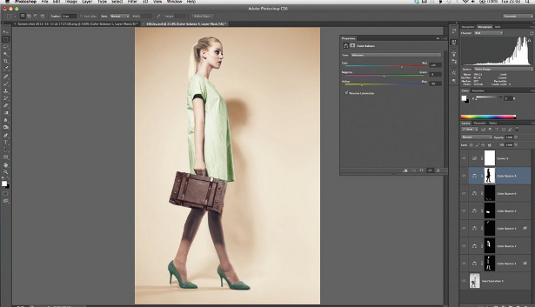
05 The remainder of the colouring can generally be taken care of without too much trouble. Wearing apparel, details and backgrounds tin usually simply be coloured in simply, with their own Color Residuum layers, without any special blending options. Because this colouring is completely nondestructive, you can go dorsum and adjust or completely remap all your colours, if you desire to.
Related articles

How To Select All White In Photoshop,
Source: https://www.creativebloq.com/colourise-black-and-white-photo-photoshop-2133819
Posted by: macleodased1942.blogspot.com
0 Response to "How To Select All White In Photoshop"
Post a Comment